Abstract
Today, it is difficult to increase a plant's capacity for growth while lowering costs, which prompts the creative concept of employing an automated irrigation system, which will further contribute to better management of both water and human resources. In order to effectively use water for irrigation, sensors technology and Arduino have been combined to create an automated irrigation system. The farmer will be able to manage irrigation using a or smartphone from any location at any time, monitor water parameters, and save time and effort while also optimising water consumption.
Introduction
The growth of agricultural nations depends heavily on agriculture. Some agricultural-related concerns have consistently slowed down the nation's progress. Therefore, updating the present conventional ways of agriculture is the only way to solve this issue. The advancement of technology has had a significant impact on agriculture, particularly in the area of irrigation, where it helped to build a variety of irrigation systems and address the issue of water scarcity [1]. Intelligent irrigation systems enhance watering schedules and automatically adjust run times to the landscape's unique requirements.[2]
For this purpose, a smart irrigation system is designed [3].To gauge the amount of moisture in the soil, we utilised a capacitive soil moisture sensor. DHT11 Humidity Temperature Sensor is used to detect both air temperature and humidity. The water pump is regulated by means of a 5V Power relay. The motor immediately starts when the sensor notices that the soil has little moisture. Consequently, the land will be automatically irrigated. The motor shuts off when the soil becomes damp. We can monitor anything remotely using NodeMCU ESP-8266.
Theory and Discussion
Components Used
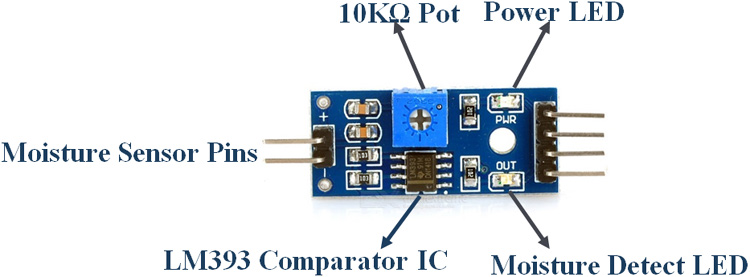
- Soil Moisture Sensor (with LM393 Driver)
In this Moisture sensor module, an LM393 Comparator IC is employed as a voltage comparator. The moisture sensor is made up of two probes that detect moisture in the soil. The moisture sensor module has four pins: VCC, GND, DO, and AO. The digital out pin is linked to the LM393 comparator IC's output pin, while the analogue pin is connected to the moisture sensor.
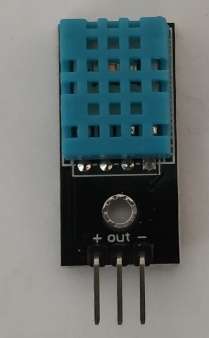
- DHT11 Temperature Sensor
The DHT11 sensor contains four pins: VCC, GND, and one for data. VCC and ground must be connected to the power supply. Power must be supplied to the dht11 sensor through these two pins. The data may be extracted from a single data pin. We can extract humidity and temperature from a single pin
- 16x2 LCD Display
- Water level Switch
- 5V Relay
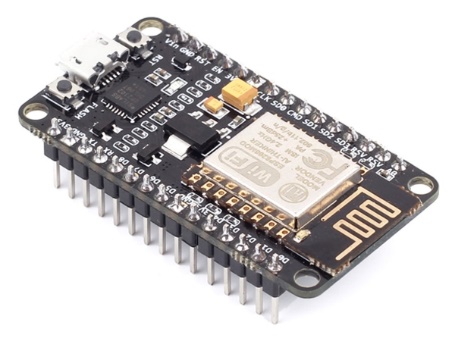
- NodeMCU ESP-8266
It is interfaced with DHT11 sensor and send the data to smartphone.
- 12V DC Pump
Circuit Diagram
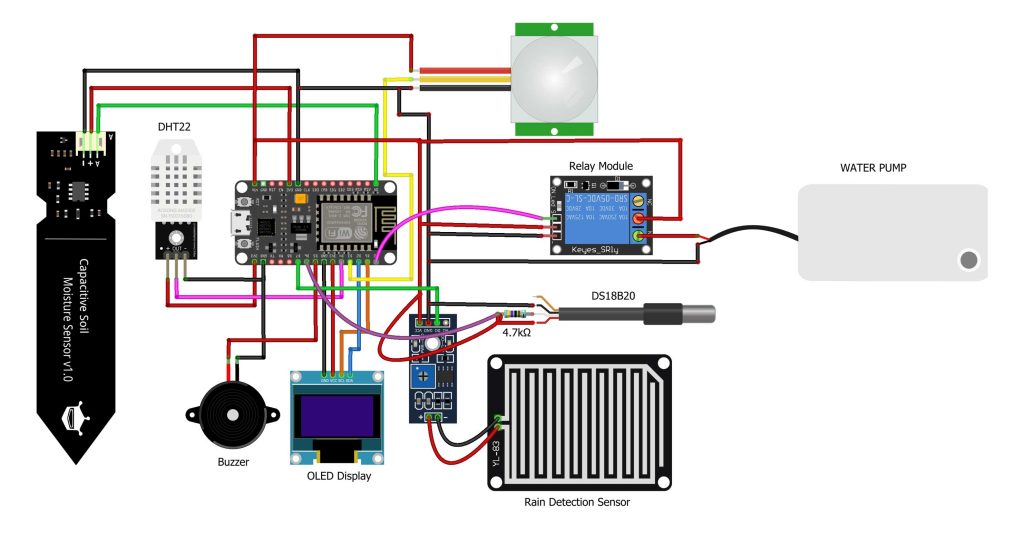
Circuit Design
- NodeMCU ESP-8266 is interfaced with DHT11 sensor and soil moisture sensor. It sends the data to smartphone to monitor its performance remotely.
- To display the status of soil moisture content and tank water level, LED is connected to NodeMCU ESP-8266 via I2C pin.
- Soil moisture sensor is connected to A0 pin of NodeMCU
- DHT11 is connected to D4 pin of NodeMCUto D4 Pin.
- Connect the relay module to the pump.
- Relay is connected to NodeMCU at D4 pin.
- 5V pin of NodeMCU is used to power pump and relay.
- 3V is required for DHT11 sensor, moisture sensor, and OLED Display.
Flowchart
The flowchart for working of moisture sensor, relay, water pump and motor is shown in diagram as follows:

Results
Working
- The water pump must be completely submerged in water. The output pipe is stored in a field for irrigation purposes.
- Similarly, the soil Moisture sensor is submerged in soil.
- When you turn on the device, the LED will display the soil humidity, air humidity, and air temperature.
- It displays real-time data.
- When the soil moisture content drops, the water pumps activate and irrigate the field until the desired moisture level is reached.
- Thingspeak Server allows you to monitor data from anywhere in the world.
- Go to the Thingspeak server's private view to do so.
- We can monitor the soil's moisture, humidity, and temperature, as well as the relay status.
Conclusions
We learned about the NodeMCU ESP8266 based smart automatic irrigation system. This system is designed to upgrade the old agricultural process. It only helps to save water but also decreases reduces the work of farmers. Smart irrigation system works automatically and is activated only when the soil is dry. This system is designed using simple sensors and NodeMCU.
References
[1] K. Taneja and S. Bhatia, "Automatic irrigation system using Arduino UNO," in 2017 International Conference on Intelligent Computing and Control Systems (ICICCS), 2017: IEEE, pp. 132-135.
[2] S. Akter, P. Mahanta, M. H. Mim, M. R. Hasan, R. U. Ahmed, and M. M. Billah, "Developing a smart irrigation system using arduino," International Journal of Research Studies in Science, Engineering and Technology, vol. 6, no. 1, pp. 31-39, 2018.
[3] H. Benyezza, M. Bouhedda, K. Djellout, and A. Saidi, "Smart Irrigation System Based Thingspeak and Arduino," in 2018 International Conference on Applied Smart Systems (ICASS), 24-25 Nov. 2018 2018, pp. 1-4, doi: 10.1109/ICASS.2018.8651993.